This was an order placed at 9.00 pm one evening and had to be finished by the next day.
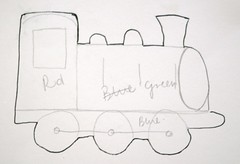
I did not have a train cookie cutter, so I had to start from scratch. I found a good image of a train which I copied and took an outline. I also decided on the colours. I decided afterwards that I would swap the colours for each individual cookie so no one cookie would look the same.
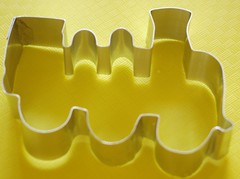
I was lucky enough to have some strips of aluminium which I had for a while but never dared use. I was pleasantly surprised how easy it is to make a cookie cutter.
This took me about 10 minutes to put together.

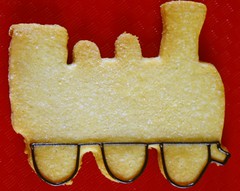
The cookie cutter was quite large so I needed to roll the cookie dough slightly thicker than normal as otherwise the biscuit would snap very easily once baked.
I always use Nigella Lawson's cookie recipe. I have tried many recipes but found that this one keeps nice and crisp and it never loses its shape. I did change the amount of eggs used as the first few tries at making the dough, it turned out quite soggy. I have put the recipe on the British Sugarcraft Guild message board. www.bsguk.org/forum/viewtopic.php?t=5330&highlight=bi...
I made royal icing using egg whites. I use a proportion of the weight of an egg to six times this weight of icing sugar. I had 50 cookies to make, so I weighed 6 egg whites and then did six times that in icing sugar.
This is beaten to full peak. Black powder (House of Sugar) is added to a couple of spoonfuls of the icing which is then paddled to get rid of the air bubbles, added just 2 drops of water to make it into piping consistency and put in a piping bag with a no. 2 (PME) nozzle.
I piped round the edges of the wheels and the bottom of the train.
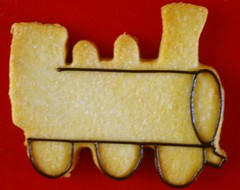
I continued piping the outline round the engine. It is a good sense to have an idea beforehand of the lines you need to pipe. I usually draw the outline of the cookie cutter on a piece of paper and drraw the piping lines.
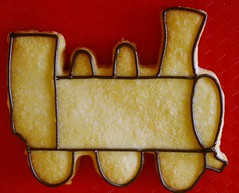
I continued with the piping of the edges and separating the compartment and funnels.
These are the completed outlines of some of the cookies.
I put aside about a cupful of full peaked royal icing for inscription and embellishments. I added water a little at a time to the rest of the royal icing and stirred it till I got "double cream" consistency. The icing should not be runny otherwise it will overflow the outline. With practice and experience, you will be able to determine the right consistency to use. One method I was taught, was to make a trail of the icing and if it settles at the count of ten, it is ok to use. I never liked this method because it depends on how quickly one counts to ten.
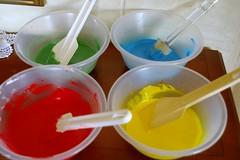
I divided the batch of run out icing into 4 separate bowls and coloured the batches with green, blue, red and yellow colourings. I also needed black but did not mix it at that time. Black colour is made up of all the other colours so I intended mixing all the left over from all the colours to make black later on.
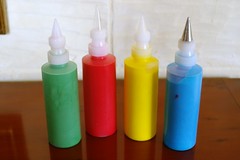
I filled up the squeeze bottles with the colours. I tend to pour the icing straight from the bowl. Again practice is needed and I now manage to direct the icing straight into the bottles and not everywhere else.
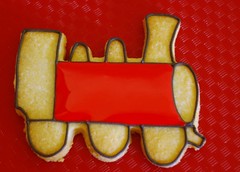
The first colour is applied. I did the middle part of the engine first in red then left the icing to dry. I like to see a shine on the icing so I put the cookies on a very low oven at 40 deg C. This helps to dry the the icing and also makes the cookie crisp again if it has softened slightly.

Once the red is dried (or at least a good skin has formed) I filled the adjacent areas with green, blue and yellow.
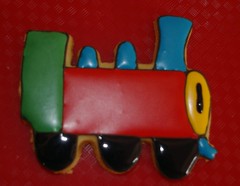
These colours were again left to dry and in the meantime, I used all the left over colours, apart from the yellow, to mix together to get the black. A little bit of black colour was added to make it more intense. I piped the wheels in black.

With the same run out consistency, I piped the curves round the engine, round the funnel and the front of the engine. I must say, I was being lazy here as I should have used black in piping consistency in a piping bag but this worked out ok even though it could have looked better.
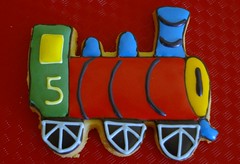
Here, I outlined the window and flooded the window in yellow. I also piped the wheels in grey piping consistency icing using 1.5 (PME) nozzle. The number 5 is the age of the child and this was piped in yellow and 1.5 (PME) nozzle.
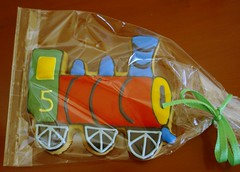
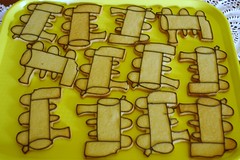
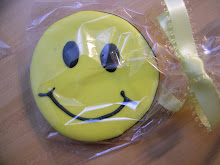
Once all the cookies were completely dried and cooled, they were bagged in polypropene bags and tied with 3mm ribbon. I have used different coloured ribbon for the cookies.
I must say, I was quite pleased with the outcome and the customer was most amazed that I could produce such cookies at such short notice.
3 comments:
this tutorial is really nice :) they re so cute.
Hi there, this is a very nice tutorial and I love the way u showed how to DIY make the cutter. Will definitely try to buy some aluminium roll and shape it to become a cutter.
Do you mind if I ask, how you make your iced cookies looking so good? the icing is very smooth! I did try to make my own icing and it was not as smooth as yours. Can you make another tutorial on how to make a good icing? Complete with tips, recipe and piping type that you use?
If you don't have time for writing a tutorial, maybe you can just email me at mrmrsimran[a]gmail[dot]com
Looking forward to hear from you.
Thanks!
The new link for the recipe is http://bsguk.org/phpBB3/viewtopic.php?f=12&t=5330&hilit=cookies
Post a Comment